
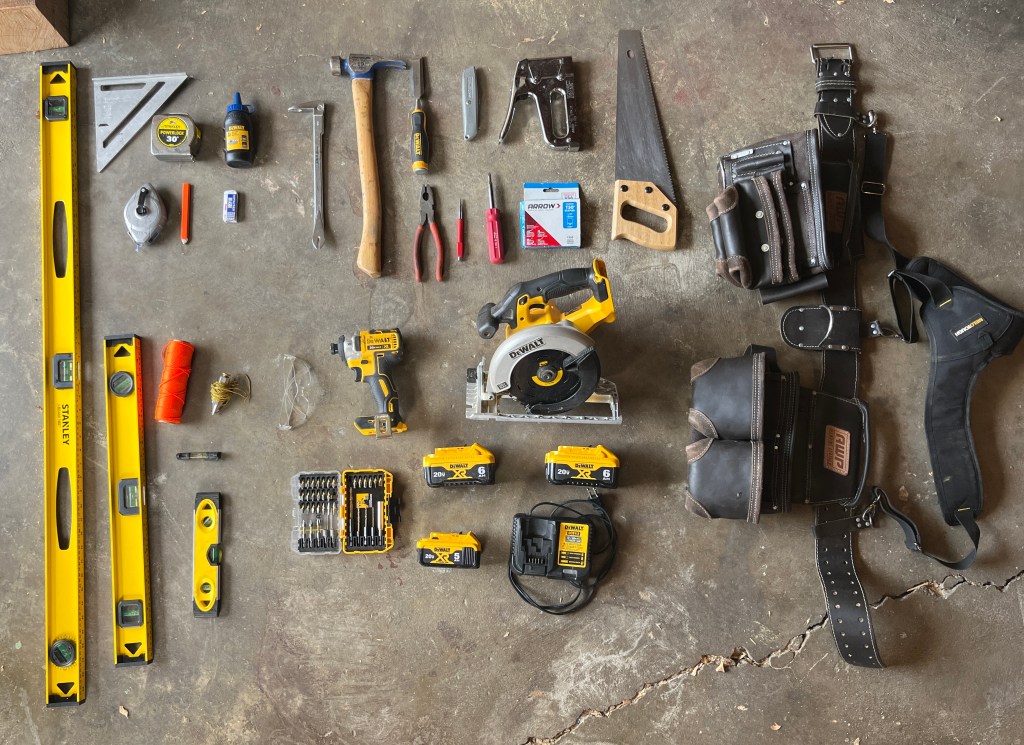
Below is a list of basic carpentry framing tools. These are the tools I used to build my 12’ x 12’ Cabin, and they can frame just about any small structure. They are tools that everyone should own.

- Bags/Hammer Holder: These are the carpenters’ bags I use. I have had them for years, and while not entirely necessary, it is helpful to consolidate tools. At the very least I recommend getting a hammer holder that attaches to your belt.
- Bag suspenders: Used to hold bags up.

- Tape Measure 30’: Measures. Enough said.
- Speed Square: One of the most essential tools for a framer. Used as a square straight edge for drawing lines or making square cuts with a circular saw. Also is used to draw correct rafter angles.
- Blue Chalk Line: Used to make straight lines. Blue chalk is not a permanent marking chalk and still provides enough contrast on wood to be usable.
- Carpenters Pencils: You can sharpen carpenter’s pencils with a knife or chisel. The thick tip won’t break as easily as a regular or mechanical pencil
- Eraser

- String Line: Used to lay out a level and square foundation.
- String line level. Attach to the string line to use as a level. I can not overstate how useful this is in building a level foundation.
- Small Level: a quick way to check the level
- 2’ level: The longer the level, the more accurate.
- Bonus: 4ft level: even more accurate than a two-foot level.
- Plumb Bob: Checks Plumb, and establishes a vertical line.

- Framing Hammer: A little larger than the regular household hammer. Makes a difference when you are pounding nails all day.
- Cats Paw: Used to pull out nails. It has a sharp tip that will dig in and get under the nail to remove it.
- Chisel: A quick fixer of mistakes/fast remover of material. Not often used, but I’m glad I have it when I need it.
- Utility Knife
- Adjustable Screwdriver
- Lineman’s Pliers: While not directly related to framing they are one of the most used tools in my carpenter bags.
- Staple gun: Used for attaching roofing felt and vapor barrier to frame.
- Punch: Marks holes with indentation, or used to drive nails further down.
- Handsaw: Helpful for finishing cuts that an electric saw can’t.

- DeWalt Impact Driver: While most wood frames are fastened with nails, there are situations where using an impact/screwdriver becomes essential. Screws are also easier to use to hold something together temporarily.
- DeWalt Impact Driver Bit Kit: This kit contains most bits you will need for basic framing. Many different screw head bits and a few drill bits will allow for pre-drilling holes of all different sizes.
- DeWalt Circular Saw: This saw is one of the most used tools for a basic framing project. I prefer a right-hand operated saw, as this is what I am used to.
- Safety Glasses: Obvious, but when forgotten and the wind blows the sawdust in the right direction you’ll remember.
- Batteries: 1 5 amp, 2 6 amp. These three batteries got us through building our 12’ x 12’ off-grid cabin.

- Dewalt Saw Horses: A buddy of mine who was moving away gave me this set of sawhorses. They are pretty sturdy and allow for an adjustable height. Any pair of sawhorses will do.


- Adjustable Ladder: This was the main ladder we used for the 12’ x 12’ cabin project. I liked this ladder as it worked as an A-Frame ladder, and an extension ladder. When shopping for a ladder, I required it to expand far enough to reach the top of the roof on the gable ends of our cabin. This ladder fit the bill.
That’s a wrap folks! To read more about the 12’x12′ cabin I built with these tools explore the website a little. If you want free plans for 12’x12′ Cabin click here.
Subscribe in the email box to never miss a post!

Leave a comment