
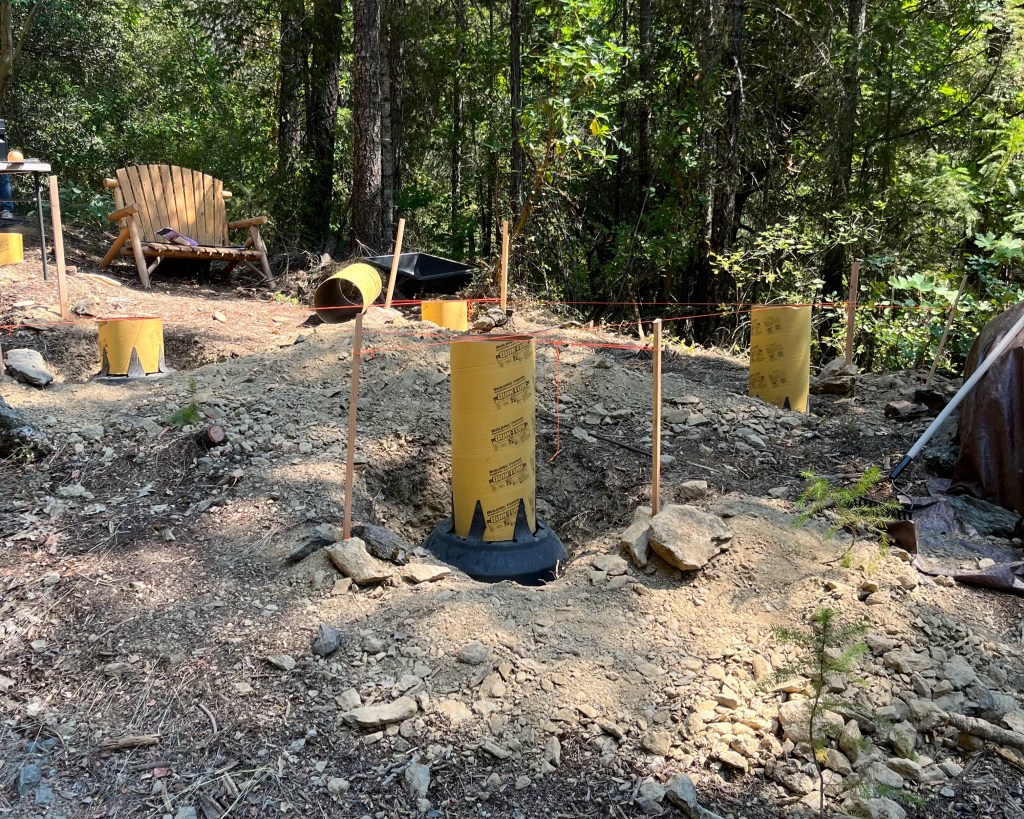

In this post, I will go over how to lay out a Sonotube foundation so you can pour a level pier foundation, even on a slope. For the 12’ x 12’ cabin build, we used a Sonotube foundation with skids on top to support the cabin. Based on load ratings, joist span tables, and long talks with family members in the construction industry, we chose to have 4 Sonotube piers with a 4” x 8” x 12’ skid to support the cabin. Foundations are supposed to start at least 12 inches below undisturbed soil and be below the frost line. The depth below the frost line helps protect the structure from moving with the freeze and thaw cycle of the ground. We used 12 inch Sonotubes with a “Redibase” 24”x24” footer. This premade footer form was handy as it allows you to insert the Sonotube into the footer form. We placed rebar in our footing and one long piece in the Sonotube. Rebar is essential to increase the strength of the concrete.
Let’s jump into how to lay this all out:

- Mark a general outline of the structure. I used wooden stakes and string line leveled with a string line level to see what a level plane would look like in my build location.
- Mark in from the outline the center where you want to place your Sonotubes that will hold up the skids. On the 12’ x 12’ Cabin this was about 3’ in from each outside edge.


3. From the center, mark the outer edge of where your footer will be and start digging based on the depth of your frost line. A digging iron, shovel, and pick-matic are your friends here.

4. Once the hole is deep enough, line the bottom with at least an inch of gravel. We used Quikrete All Purpose gravel.
5. Place the footing form in the hole and get a rough level by moving the gravel around.

6. Place wooden stakes marking the centerline of the footing on each side of the foundation. This should be at least 8 stakes.

7. Use a string to mark the level plane you want the foundation to come to. Run a string line across the build area to the opposite stake. Make sure the string line is taught. I used a bowline and trucker’s hitch to achieve this.

8. Level up the string line plane. Start in one corner and work your way around, ensuring all lines are level while intersecting in each corner. Get the string line where you want the ideal height of your foundation to be. Take your time with this. This is important. You might have to adjust multiple times to get the level and height you are looking for.


9. With rough leveled footer forms and an accurately marked foundation height: cut your Sonotubes to height. Ensure the Sonotubes overlap in the footer slightly.

10. Install rebar in the footer. We used metal wire to tie the rebar in a ‘tic-tac-toe’ pattern. We then placed this in the footing on top of small rocks to put the rebar in the middle of the footer.

11. Hammer one long piece of rebar into the center of the Sonotube. We used a mini sledge to get the rebar deep enough in the ground.

12. Level the Sonotubes. Place the Sonotubes in the footer and shimmy them up level with the level string line. Be extra careful not to push the string line up, as this would offset the level. Double check level by ensuring the Sonotube is vertically level (place torpedo or 2’ level on the side of Sonotube)
13. Tape Sonotubes to footer forms.
With your forms all leveled, you are ready to pour! I will go over that in Part 2 next week. Subscribe in the email box to never miss a post!
For construction plans for the full 12′ x 12′ cabin build click: here.

Leave a reply to Oscar Cancel reply